Advance Git & GitHub for DevOps Engineers: Part-2 | Day 11 of 90 Days of DevOps

Hi there, welcome to my blog! Today I’m going to share with you some advanced Git and GitHub tips for DevOps engineers.
In this post, I will cover three topics: git stash, cherry-pick, and resolving conflicts.
Let’s get started! 😊
Git stash
Git stash is a handy command that allows you to temporarily save your local changes without committing them. This is useful when you need to switch to a different branch, pull the latest changes, or work on something else without losing your progress. To use git stash, you simply run:
git stash
This will create a new stash entry and revert your working directory and index to the state of the last commit. You can see the list of stashed entries with:
git stash list
To bring back the changes from the most recent stash entry and apply them on top of the current branch, you can use:
git stash pop
This will also drop the stash entry from the list. Alternatively, you can use:
git stash apply
This will apply the changes but keep the stash entry for later use. You can also specify which stash entry to apply or pop by using its index or name, such as:
git stash pop stash@{1}
To delete a stash entry without applying it, you can use:
git stash drop
You can also clear all the stash entries with:
git stash clear
Task 1: Using git stash
Let’s see how we can use git stash in a real scenario. Here are the steps I followed for this task:
a. Create a new branch and make some changes to it.
git checkout -b feature1 # create and switch to a new branch called feature1
echo "This is a new feature" >> feature.txt # append some text to a file called feature.txt
git add feature.txt # stage the file for commit

b. Use git stash to save the changes without committing them.
git stash # save the changes and revert the working directory and index

c. Switch to a different branch, make some changes and commit them.
git checkout master # switch to the main branch
echo "This is an update" >> update.txt # append some text to a file called update.txt
git add update.txt # stage the file for commit
git commit -m "Added an update" # commit the changes with a message

d. Use git stash pop to bring the changes back and apply them on top of the new commits.
git checkout feature1 # switch back to the feature1 branch
git stash pop # apply the stashed changes and drop the stash entry

Cherry-pick
Git cherry-pick is a powerful command that allows you to pick a specific commit from one branch and apply it onto another branch. This is useful when you want to integrate only some changes from another branch, without merging or rebasing the whole branch. To use git cherry-pick, you need to specify the commit hash or reference of the commit you want to pick, such as:
git cherry-pick d48e74c # pick commit d48e74c and apply it on top of the current branch
You can also pick multiple commits at once by using a range of references, such as:
git cherry-pick d48e74c..f48e74c # pick all commits from d48e74c (exclusive) to f48e74c (inclusive) and apply them on top of the current branch
By default, git cherry-pick will create a new commit with the same message and author as the original commit. However, you can modify this behavior by using some options, such as:
-eor--edit: This will let you edit the commit message before applying it.-x: This will append a line that says “(cherry picked from commit …)” to the original commit message, indicating where the change came from.-nor--no-commit: This will apply the change but not create a new commit, allowing you to make further modifications before committing.-m <parent-number>or--mainline <parent-number>: This is used when cherry-picking a merge commit. It specifies which parent of the merge should be considered the mainline, and the change will be replayed relative to that parent.
Sometimes, git cherry-pick may encounter conflicts when applying a commit. In that case, you need to resolve the conflicts manually and then continue the cherry-pick operation with:
git cherry-pick --continue
Alternatively, you can abort the cherry-pick operation and restore the original state with:
git cherry-pick --abort
Task 2: Using git cherry-pick
Let’s see how we can use git cherry-pick in a real scenario. Here are the steps I followed for this task:
a. In version01.txt of development branch add the below lines after “This is the bug fix in development branch” that you added in Day10 and reverted to this commit.
git checkout development # switch to the development branch
echo "Line2>> After bug fixing, this is the new feature with minor alteration" >> version01.txt # append some text to the file

b. Commit this with a message “ Added feature2.1 in development branch”
git add version01.txt # stage the file for commit
git commit -m "Added feature2.1 in development branch" # commit the changes with a message

c. Line3>> This is the advancement of the previous feature
echo "Line3>> This is the advancement of previous feature" >> version01.txt # append some more text to the file

d. Commit this with a message “ Added feature2.2 in development branch”
git add version01.txt # stage the file for commit
git commit -m "Added feature2.2 in development branch" # commit the changes with a message

e. Line4>> Feature 2 is completed and ready for release
echo "Line4>> Feature 2 is completed and ready for release" >> version01.txt # append some more text to the file

f. Commit this with a message “ Feature2 completed”
git add version01.txt # stage the file for commit
git commit -m "Feature2 completed" # commit the changes with a message
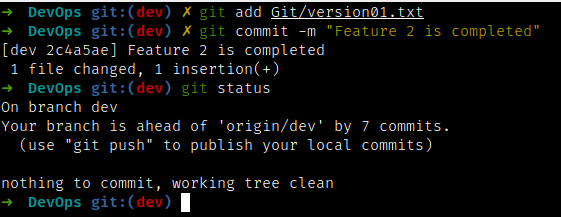
g. All these commits messages should be reflected in the Production branch too which will come out from the Master branch.
git checkout master # switch to the master branch
git checkout -b production # create and switch to a new branch called production based on master
git rebase development # rebase the production branch onto the development branch, replaying all the commits from development on top of production

h. In the Production branch Cherry pick Commit “Added feature2.2 in development branch” and added the below lines in it:
git cherry-pick -e <commit-hash> # cherry pick the commit with hash <commit-hash> and edit the message before applying it
# In the editor, add below lines after Line3>> This is the advancement of previous feature
Line4>>Added few more changes to make it more optimized.
# Save and exit the editor to complete the cherry pick operation

i. Commit: Optimized the feature
# No need to commit again, as the cherry pick operation already created a new commit with the message "Optimized the feature"
Resolving conflicts
Git conflicts are inevitable when working with multiple developers on a project. They occur when two or more developers have made different changes to the same file or line of code, and Git cannot automatically merge them. Conflicts can also happen when you try to merge, rebase, or cherry pick commits that have incompatible changes.
When Git encounters a conflict, it will mark the file as being conflicted and halt the operation. It will also insert some conflict markers into the file to indicate where the conflicting changes are. The conflict markers look something like this:
<<<<<<< HEAD
This is some content from the current branch.
=======
This is some content from another branch.
>>>>>>> another-branch
The part between <<<<<<< HEAD and ======= is what you have in your current branch, and the part between ======= and >>>>>>> another-branch is what you are trying to merge from another branch. You need to decide which part to keep, or edit them to create a new version that combines both changes.
To resolve a conflict, you need to follow these steps:
Check status with
git statusandgit diff. This will show you which files are conflicted and where the conflicts are.Decide what you keep (the one, the other, or both or something else). Edit the file
Conclusion
I hope you enjoyed this blog post and learned something new about Git and GitHub. These are some of the most useful and powerful tools for DevOps engineers, and mastering them will help you collaborate better with your team and deliver high-quality software. If you have any questions or feedback, feel free to leave a comment below or contact me on GitHub or LinkedIn.
Thanks for reading and happy coding! 😄
About the author
👩💻 As a seasoned software engineer with 7+ years of experience, my expertise includes:
- 🌐 Developing web applications using Javascript (frontend and backend)
- 💼 Working across diverse industries like construction, finance, marketing, and entrepreneurship
- 🎓 Holding a postgraduate degree in Master of Computer Applications from the University of Pune
🔧 My technical prowess lies in:
- ⚛️ Leading Javascript frameworks: React, Node.js, and Express.js
- 🚀 Delivering robust and scalable web applications with the best software engineering practices
🌱 Excitingly, I've started my DevOps learning journey with #90DaysOfDevOps to enhance my skills in this area.
🧠 Beyond technical skills, I offer:
- 💡 Exceptional problem-solving abilities and a strong aptitude for learning new technologies
- 🤝 A collaborative mindset, making me a valuable team player in diverse environments
🚀 My passion is in delivering high-quality software solutions that solve real-world problems. If you're seeking a skilled and experienced software engineer for top-notch web applications, let's connect and explore potential opportunities together! 🤝
Comments
Join the discussionNo comments yet. Be the first to comment.