Launching Your Kubernetes Cluster with Deployment | Day 32 of 90 Days of DevOps
Welcome to Day 32 of 90 Days of DevOps.
Today, we will learn how to launch a Kubernetes cluster with Deployment, a configuration that allows us to manage updates to Pods and ReplicaSets. We will also deploy a sample ToDo application on Kubernetes using the auto-healing and auto-scaling features.
By the end of this blog post, you will be able to:
Understand what Kubernetes Deployments are and why they are useful
Deploy a sample ToDo application on Kubernetes using Deployment
Use
kubectlto inspect and manage the DeploymentEnable auto-healing and auto-scaling for the Deployment
Let’s get started!
Understanding Kubernetes Deployments
A Deployment in Kubernetes provides a configuration for managing updates to Pods and ReplicaSets. A Pod is a group of one or more containers that share the same network namespace and storage volumes. A ReplicaSet is a controller that ensures that a specified number of Pods are running at any given time.
A Deployment allows you to describe the desired state of your application, such as the number of replicas, the image version, the update strategy, etc. The Deployment Controller ensures that the actual state matches this desired state, typically at a controlled rate. For example, you can use a Deployment to roll out a new version of your application without downtime or to roll back to a previous version if something goes wrong.
Deployments are useful for scaling by creating new replicas or replacing existing ones while maintaining high availability. You can also use Deployments to enable auto-healing and auto-scaling for your application, which we will see later in this post.
Practical Application - Deploying a Sample ToDo App
In this section, we will deploy a sample ToDo application on Kubernetes using Deployment. The ToDo application is a simple web app that allows you to create and manage tasks. The app is written in Node.js. We will use the Docker image ajitfawade14/first-repo as the source for our app.
To deploy the sample ToDo app on Kubernetes using Deployment, follow these steps:
- Create a YAML file named
deployment.ymlwith the following content:
apiVersion: apps/v1
kind: Deployment
metadata:
  name: todo-app
  labels:
    app: todo
spec:
  replicas: 2
  selector:
    matchLabels:
      app: todo
  template:
    metadata:
      labels:
        app: todo
    spec:
      containers:
      - name: todo
        image: rishikeshops/todo-app
        ports:
        - containerPort: 3000
This file defines a Deployment object named todo-app that creates two replicas of Pods that run the ajitfawade14/first-repo image. The Pods expose port 3000 for the web server.
- Apply the YAML file to create the Deployment by running:
kubectl apply -f deployment.yml
This will create the Deployment and its associated ReplicaSet and Pods.
- Verify that the Deployment is created by running:
kubectl get deployments
You should see something like this:

This shows that you have one Deployment named todo-app that has two replicas ready and up-to-date.
- Verify that the Pods are running by running:
kubectl get pods
You should see something like this:

This shows that you have two Pods named todo-app-<random-string> that are running and ready.
- Expose the Pods as a Service by running:
kubectl expose deployment todo-app --port=80 --type=LoadBalancer
This will create a Service object named todo-app that exposes port 80 of the Pods as a LoadBalancer service. A LoadBalancer service allocates an external IP address and routes traffic from that IP address to the Pods.
- Verify that the Service is created by running:
kubectl get services
You should see something like this:

This shows that you have two Services in your cluster: the kubernetes service, which is the default service for the cluster API, and the todo-app service, which exposes port 80 of the Pods as port 3000 on an external IP address.
- Access the ToDo app from your browser by going to http://<external-ip>:3000/.
Congratulations! You have successfully deployed a sample ToDo app on Kubernetes using Deployment.
Using kubectl to Inspect and Manage the Deployment
In this section, we will use kubectl to inspect and manage the Deployment that we created in the previous section. kubectl is a command-line tool that allows you to interact with Kubernetes clusters and perform various operations on them.
To use kubectl to inspect and manage the Deployment, follow these steps:
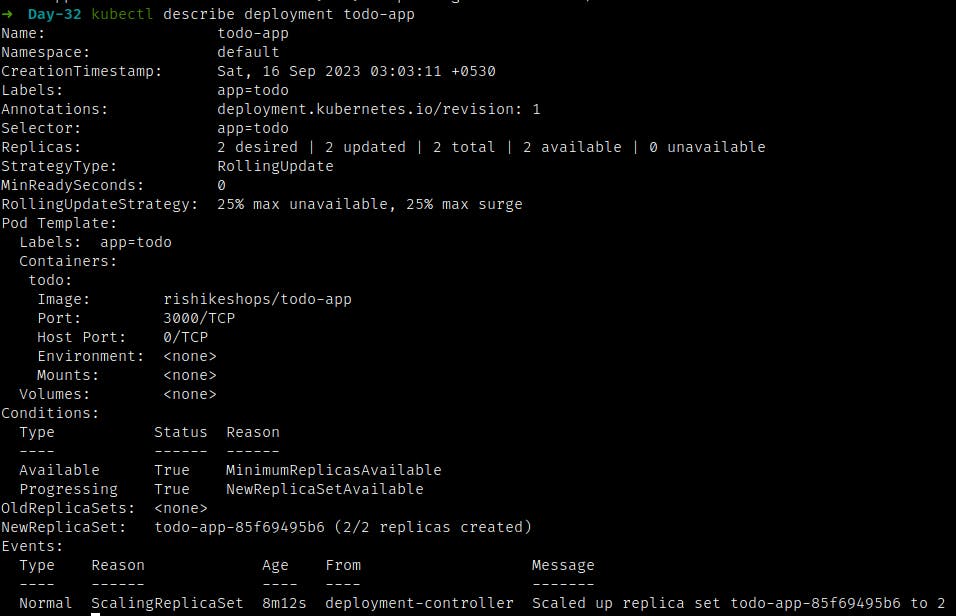
- Get the details of the Deployment by running:
kubectl describe deployment todo-app
This will show you the information about the Deployment, such as the labels, the replicas, the selector, the template, the update strategy, the conditions, the events, etc.
You should see something like this:

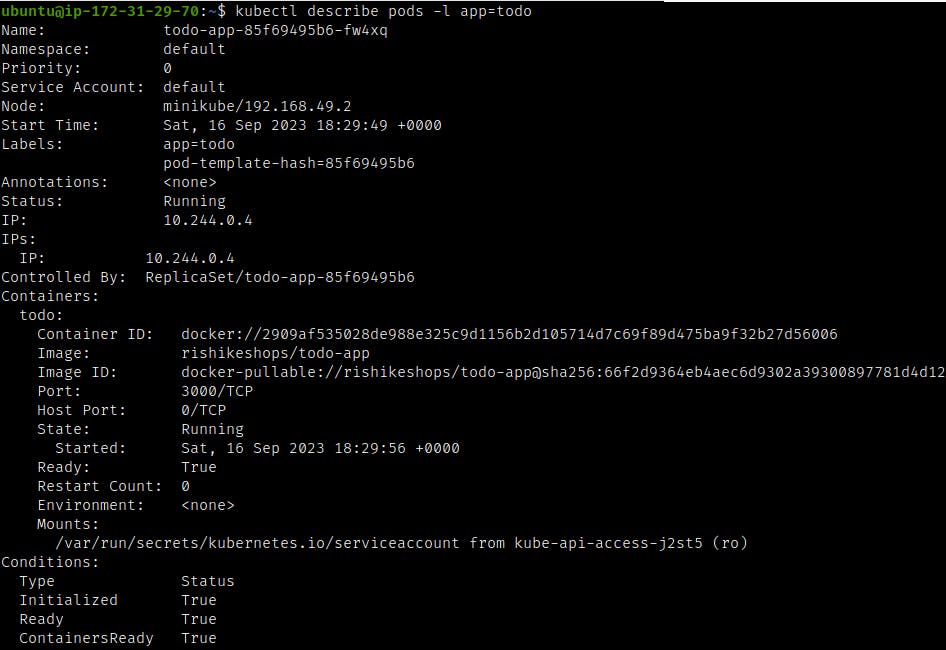
- Get the details of the Pods by running:
kubectl describe pods -l app=todo
This will show you the information about the Pods that belong to the Deployment, such as the labels, the status, the containers, the volumes, the events, etc.
You should see something like this:

- Get the logs of a Pod by running:
kubectl logs <pod-name>
Replace <pod-name> with the name of one of the Pods that you want to see the logs of.
This will show you the output of the container running in the Pod.
You should see something like this:

- Execute a command in a Pod by running:
kubectl exec -it <pod-name> -- <command>
Replace <pod-name> with the name of one of the Pods that you want to execute a command in, and <command> with the command that you want to execute.
This will open an interactive shell in the container running in the Pod and execute the command.
For example, you can run kubectl exec -it todo-app-<random-string> -- sh to open a bash shell in one of the Pods.
You should see something like this:

- Scale up or down the number of replicas by running:
kubectl scale deployment todo-app --replicas=<number>
Replace <number> with the desired number of replicas that you want to have.
This will update the Deployment and create or delete Pods accordingly.
For example, you can run kubectl scale deployment todo-app --replicas=3 to increase the number of replicas to 3.
You should see something like this:

- Update the image version by running:
kubectl set image deployment todo-app todo=<new-image>
Replace <new-image> with the name of the new image that you want to use.
This will update the Deployment and create a new ReplicaSet that uses the new image. The old ReplicaSet will be scaled down and eventually deleted.
For example, you can run kubectl set image deployment todo-app todo=ajitfawade14/first-repo:v2 to use a new version of your image.
You should see something like this:

- Roll back to a previous version by running:
kubectl rollout undo deployment todo-app
This will undo the last update that was made to the Deployment and restore it to its previous state.
You should see something like this:

Enabling Auto-Healing and Auto-Scaling for the Deployment
In this section, we will enable auto-healing and auto-scaling for our Deployment. Auto-healing is a feature that allows Kubernetes to automatically restart failed containers or reschedule Pods to healthy nodes. Auto-scaling is a feature that allows Kubernetes to automatically adjust the number of replicas based on demand or metrics.
To enable auto-healing and auto-scaling for our Deployment, follow these steps:
- To enable auto-healing, we don’t need to do anything special. Kubernetes already does this by default for Deployments. If a container crashes or a node fails, Kubernetes will automatically create a new Pod and assign it to a healthy node.
To test this feature, you can manually delete one of your Pods by running:
kubectl delete pod <pod-name>
Replace <pod-name> with the name of one of your Pods that you want to delete.
You should see something like this:

If you check your Pods again by running kubectl get pods, you should see that a new Pod has been created to replace the deleted one.
You should see something like this:

- To enable auto-scaling, we need to create a Horizontal Pod Autoscaler (HPA) object that defines how we want to scale our Deployment based on CPU utilization or other metrics.
To create an HPA object that scales our Deployment between 1 and 5 replicas based on CPU utilization, run:
kubectl autoscale deployment todo-app --min=1 --max=5 --cpu-percent=50
This will create an HPA object named todo-app that monitors the average CPU utilization of our Pods and adjusts the number of replicas accordingly.
You should see something like this:

To verify that the HPA is created, run:
kubectl get hpa
You should see something like this:
This shows that you have one HPA named todo-app that targets the Deployment todo-app with a minimum of 1 and a maximum of 5 replicas, and a target CPU utilization of 50%.
To see the current CPU utilization and the desired number of replicas, run:
kubectl get hpa -w
This will show you the HPA status in a watch mode, which updates every few seconds.
This shows that the current CPU utilization is 0% and the current number of replicas is 2
To test the auto-scaling feature, you can generate some load on your Pods by running:
kubectl run -it --rm load-generator --image=busybox /bin/sh
This will create a temporary Pod named load-generator that runs a shell in an interactive mode.
In the shell, run the following command:
while true; do wget -q -O- http://todo-app.default.svc.cluster.local; done
This will send an infinite loop of requests to the ToDo app service.
In another terminal, watch the HPA status by running:
kubectl get hpa -w
You should see that the CPU utilization increases and the number of replicas changes accordingly.
This shows that the HPA has scaled up the number of replicas to 5 to handle the increased load.
To stop the load generator, press Ctrl+C in the shell and exit.
You should see that the CPU utilization decreases and the number of replicas changes accordingly.
This shows that the HPA has scaled down the number of replicas to 1 to save resources.
Congratulations! You have successfully enabled auto-healing and auto-scaling for your Deployment.
Conclusion
In this blog post, we learned how to launch a Kubernetes cluster with Deployment, a configuration that allows us to manage updates to Pods and ReplicaSets. We also deployed a sample ToDo app on Kubernetes using Deployment and enabled auto-healing and auto-scaling for it.
I hope you enjoyed this blog post and learned something new. If you have any questions or feedback, please feel free to leave a comment below.
If you want to follow my journey of learning DevOps, you can check out my GitHub and LinkedIn profile.
Thank you for reading and stay tuned for more!
